目标
- 目标描述
开发Dify自定义工具,自定义工具可以后面给Agent、工作流调用。
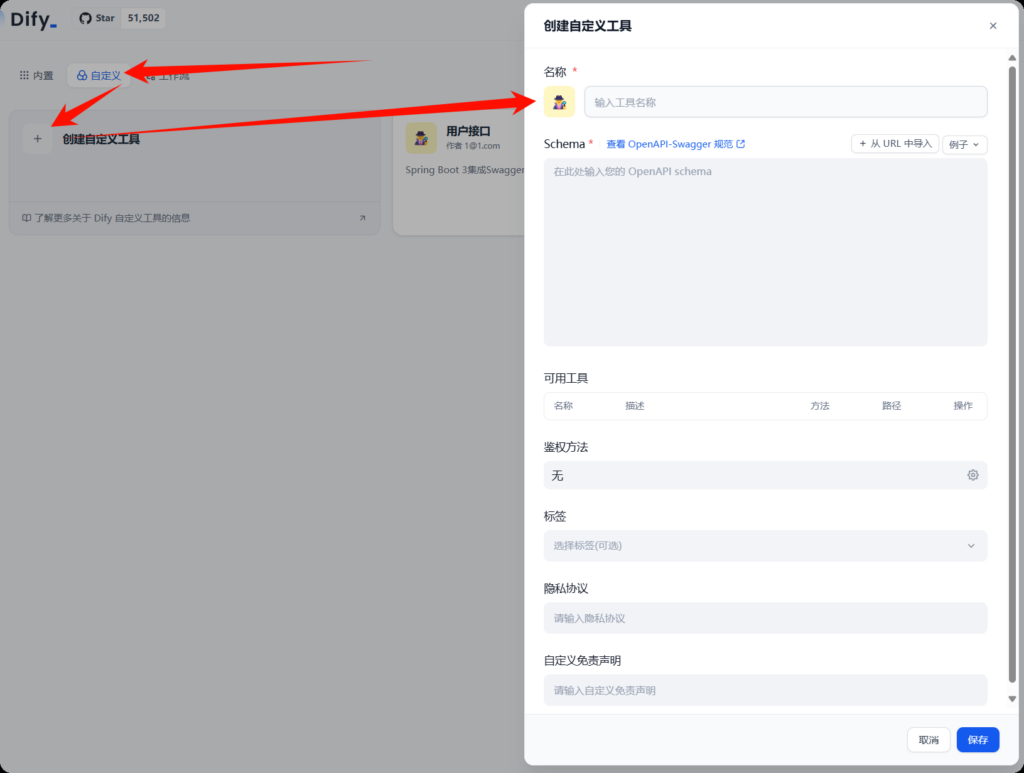
- 效果
开发几个工具,用来查询用户的相关信息,比如根据名称查询ID,根据ID查询用户详情等。
开发后台接口
新建Spring boot 3 项目
流程略
技术栈:Springboot3 java21
整合Swagger
- 引入依赖
        <!-- https://mvnrepository.com/artifact/io.swagger.core.v3/swagger-annotations -->
        <dependency>
            <groupId>io.swagger.core.v3</groupId>
            <artifactId>swagger-annotations</artifactId>
            <version>2.2.25</version>
        </dependency>

        <!-- https://mvnrepository.com/artifact/org.springdoc/springdoc-openapi-starter-webmvc-ui -->
        <dependency>
            <groupId>org.springdoc</groupId>
            <artifactId>springdoc-openapi-starter-webmvc-ui</artifactId>
            <version>2.6.0</version>
</dependency>- 添加配置文件,定义swagger访问路
springdoc.swagger-ui.path=/swagger-ui.html- 添加swagger配置
@Configuration
public class SwaggerConfig {
    @Bean
    public OpenAPI customOpenAPI() {
        return new OpenAPI()
                .info(new Info()
                        .title("项目API文档")
                        .version("1.0")
                        .description("Spring Boot 3集成Swagger示例"));
    }
}
开发接口
- 定义一个User类,用来查询的对象
@Entity
@Table(name = "users")
@Data
public class User {

    @Id
    @GeneratedValue(strategy = GenerationType.IDENTITY)
    private Long id; // 用户ID,主键

    @Column(nullable = false, length = 50)
    private String username; // 用户名

    @Column(nullable = false, length = 100, unique = true)
    private String email; // 邮箱

    @Column(nullable = false, length = 255)
    private String passwordHash; // 密码哈希

    @Column(nullable = false)
    private LocalDateTime createdAt; // 创建时间

    @Column(nullable = false)
    private LocalDateTime updatedAt; // 更新时间

    @Column
    private LocalDateTime lastLogin; // 最后登录时间

    @Column(nullable = false)
    private Integer status; // 用户状态(1:激活,0:禁用)

    @Column(columnDefinition = "TEXT")
    private String bio; // 用户简介

    @Column(length = 255)
    private String avatarUrl; // 头像URL


}
- 开发接口,创建了4个接口
@Tag(name = "用户管理")
@RestController
@RequestMapping("/user")
public class UserController {

    @GetMapping("/getUserIdByName")
    @Operation(summary = "根据用户名获取用户信息")
    public ResponseEntity<Long> getUserInfoByName(String username) {
        switch (username) {
            case "小明":
                return ResponseEntity.ok(1L);
            case "zhangsan":
                return ResponseEntity.ok(2L);
            case "lisi":
                return ResponseEntity.ok(3L);
            default:
                return ResponseEntity.ok(-1L);
        }
    }

    @GetMapping("/getUserInfoById")
    @Operation(summary = "根据用户ID获取用户信息")
    public ResponseEntity<User> getUserInfoById(Long userId) {
        User user = new User();
        user.setId(userId);
        user.setUsername("user1");
        user.setEmail("[email protected]");
        user.setPasswordHash("hashed_password");
        user.setCreatedAt(null);
        user.setUpdatedAt(null);
        user.setStatus(1);
        user.setBio("This is user 1");
        user.setAvatarUrl("http://example.com/avatar1.png");
        return ResponseEntity.ok(user);
    }

    @Operation(summary = "根据用户ID获取用户的老师名称列表")
    @GetMapping("/getUserTeacherNamesById")
    public ResponseEntity<List<String>> getUserTeacherNamesById(Long userId) {
        return ResponseEntity.ok(List.of("zhangsan(数学)", "lisi(语文)"));
    }


    @Operation(summary = "根据用户ID获取用户分数")
    @GetMapping("/getUserScoreById")
    public ResponseEntity<Integer> getUserScoreById(Long userId) {
        return ResponseEntity.ok(100);
    }

}
启动项目,查看Swagger文档
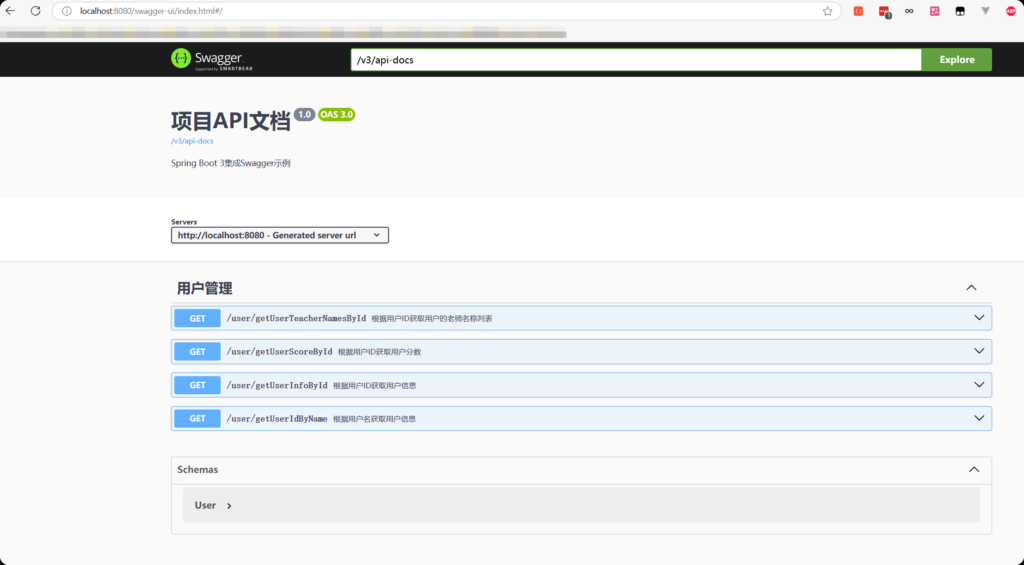
Dify添加接口查询工具
注意事项:
- 后端服务如果是本地启动测试的话,不要使用localhost\127.0.0.1, 目的是保证Dify的后台能调通上面开发的后端接口。
- 使用本地局域网IP,CMD ipconfig
- 我本地地址和端口:192.168.50.43:8080
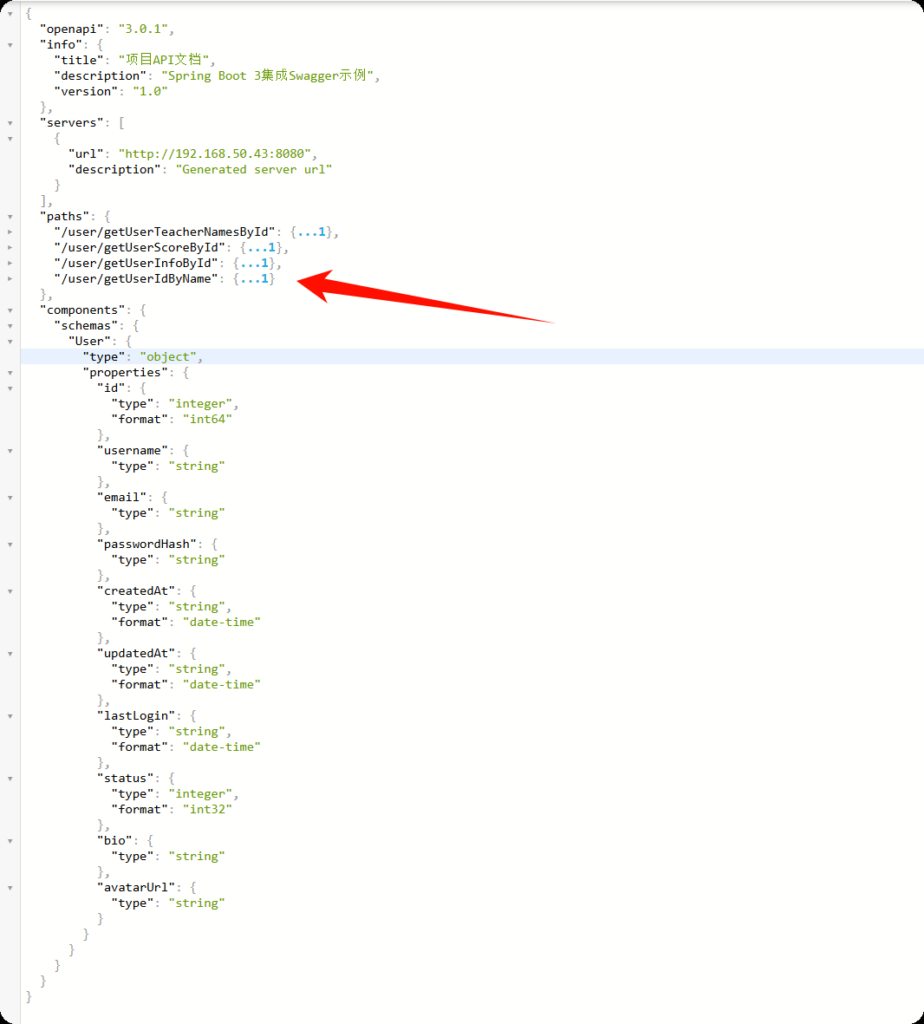
方式一 通过/v3/api-docs 批量导入
流程
- 查看显示是否正常,是否有自己编写的API
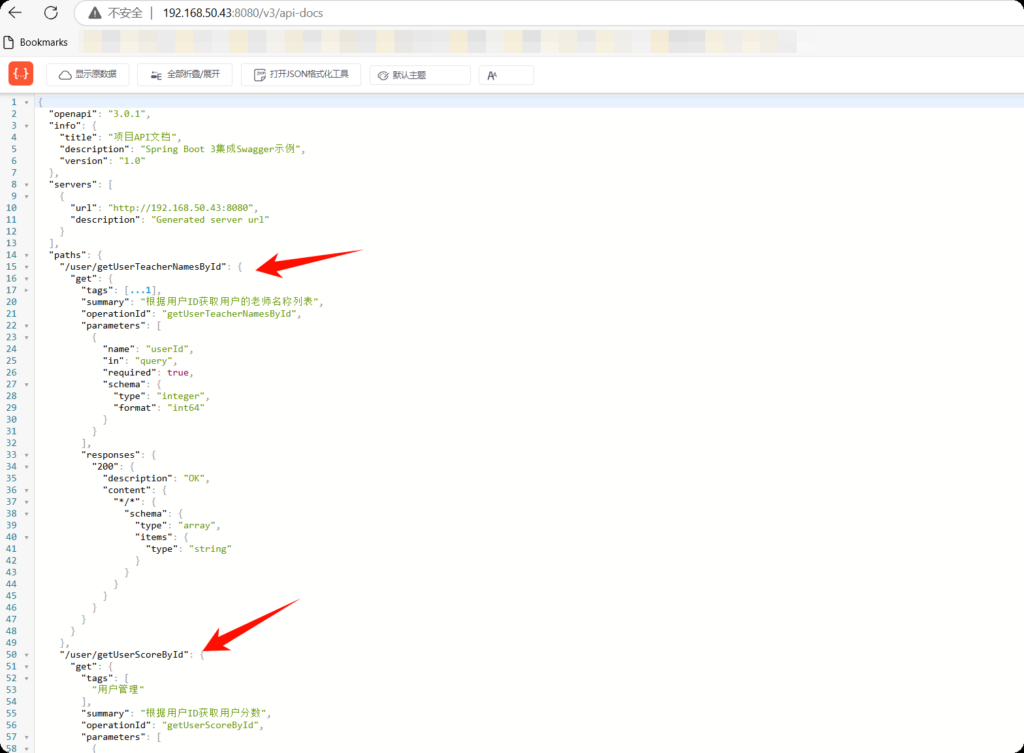
- 打开Dify 创建工具页面,把上面的大JSON复制进去,会自动识别里面的所有接口
- 点击”从URL中导入“ 把接口地址填进去即可
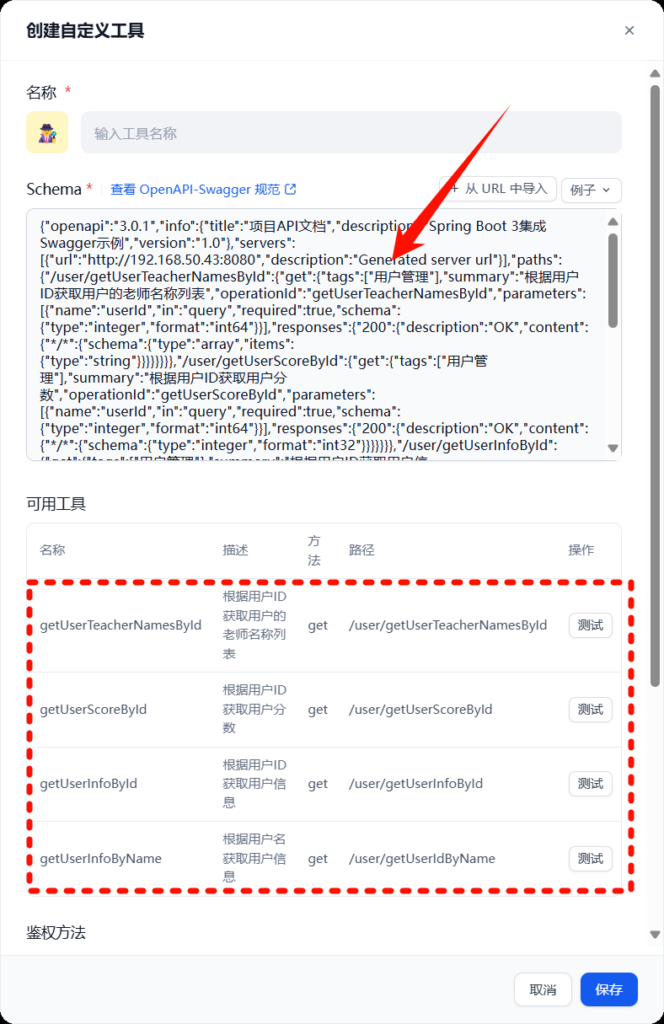
- 起个名字点击保存即可
鉴权
- 无鉴权:自己线上环境部署一个内网可以不加鉴权,本次Demo没有加鉴权
- 有鉴权:
- 不支持appid secret 这种两个header 的鉴权,也不支持先根据这两个密钥获取TOKEN,再使用TOKEN(工作流形式的工具支持)
- 只支持下图中的三种单header形式。

测试
- 点击测试,填入需要的参数即可


- 没问题的话点保存
存在的问题
- 如果是成熟的项目,会有很多接口,这个方法会不太适用,因为会导入所有的接口
方式二 单个接口添加
流程
- 本质是一个包含所有 接口描述的大JSON
- 可以删掉不需要的JSON字段,或只复制需要的JSON字段
{
  "openapi": "3.0.1",
  "info": {
    "title": "项目API文档",
    "description": "Spring Boot 3集成Swagger示例",
    "version": "1.0"
  },
  "servers": [
    {
      "url": "http://192.168.50.43:8080",
      "description": "Generated server url"
    }
  ],
  "paths": {
    "/user/getUserInfoById": {
      "get": {
        "tags": [
          "用户管理"
        ],
        "summary": "根据用户ID获取用户信息",
        "operationId": "getUserInfoById",
        "parameters": [
          {
            "name": "userId",
            "in": "query",
            "required": true,
            "schema": {
              "type": "integer",
              "format": "int64"
            }
          }
        ],
        "responses": {
          "200": {
            "description": "OK",
            "content": {
              "*/*": {
                "schema": {
                  "$ref": "#/components/schemas/User"
                }
              }
            }
          }
        }
      }
    }
  },
  "components": {
    "schemas": {
      "User": {
        "type": "object",
        "properties": {
          "id": {
            "type": "integer",
            "format": "int64"
          },
          "username": {
            "type": "string"
          },
          "email": {
            "type": "string"
          },
          "passwordHash": {
            "type": "string"
          },
          "createdAt": {
            "type": "string",
            "format": "date-time"
          },
          "updatedAt": {
            "type": "string",
            "format": "date-time"
          },
          "lastLogin": {
            "type": "string",
            "format": "date-time"
          },
          "status": {
            "type": "integer",
            "format": "int32"
          },
          "bio": {
            "type": "string"
          },
          "avatarUrl": {
            "type": "string"
          }
        }
      }
    }
  }
}- 需要的字段,Dify 给出了空白模板的例子

{
      "openapi": "3.1.0",
      "info": {
        "title": "Untitled",
        "description": "Your OpenAPI specification",
        "version": "v1.0.0"
      },
      "servers": [
        {
          "url": ""
        }
      ],
      "paths": {},
      "components": {
        "schemas": {}
      }
}- 后续相同的步骤
优点
- 灵活,可以随意的添加自己需要的接口
方式三 不依赖Swagger这个工具,生成OpenAPI格式的模板
原理:交给大模型来生成这个模板
- 复制接口的入参、出参、接口定义、请求地址,和Dify的空白模板
- 大模型询问内容:
    @GetMapping("/getUserInfoById")
    @Operation(summary = "根据用户ID获取用户信息")
    public ResponseEntity<User> getUserInfoById(Long userId) {
}

@Entity
@Table(name = "users")
@Data
public class User {

    @Id
    @GeneratedValue(strategy = GenerationType.IDENTITY)
    private Long id; // 用户ID,主键

    @Column(nullable = false, length = 50)
    private String username; // 用户名

    @Column(nullable = false, length = 100, unique = true)
    private String email; // 邮箱

    @Column(nullable = false, length = 255)
    private String passwordHash; // 密码哈希

    @Column(nullable = false)
    private LocalDateTime createdAt; // 创建时间

    @Column(nullable = false)
    private LocalDateTime updatedAt; // 更新时间

    @Column
    private LocalDateTime lastLogin; // 最后登录时间

    @Column(nullable = false)
    private Integer status; // 用户状态(1:激活,0:禁用)

    @Column(columnDefinition = "TEXT")
    private String bio; // 用户简介

    @Column(length = 255)
    private String avatarUrl; // 头像URL


}

本地IP地址:http://192.168.50.43:8080/

帮填充下面模板,生成OpenAPI 的描述:
{
      "openapi": "3.1.0",
      "info": {
        "title": "Untitled",
        "description": "Your OpenAPI specification",
        "version": "v1.0.0"
      },
      "servers": [
        {
          "url": ""
        }
      ],
      "paths": {},
      "components": {
        "schemas": {}
      }
}- 大模型的回答:
根据你提供的代码,以下是根据 OpenAPI 3.1 规范生成的描述模板:

...json
{
  "openapi": "3.1.0",
  "info": {
    "title": "User Service API",
    "description": "This API allows you to retrieve user information based on user ID.",
    "version": "v1.0.0"
  },
  "servers": [
    {
      "url": "http://192.168.50.43:8080/"
    }
  ],
  "paths": {
    "/getUserInfoById": {
      "get": {
        "summary": "根据用户ID获取用户信息",
        "operationId": "getUserInfoById",
        "parameters": [
          {
            "name": "userId",
            "in": "query",
            "required": true,
            "schema": {
              "type": "integer",
              "format": "int64",
              "example": 1
            },
            "description": "The ID of the user to fetch"
          }
        ],
        "responses": {
          "200": {
            "description": "成功返回用户信息",
            "content": {
              "application/json": {
                "schema": {
                  "$ref": "#/components/schemas/User"
                }
              }
            }
          },
          "400": {
            "description": "请求参数错误"
          },
          "404": {
            "description": "未找到指定用户"
          },
          "500": {
            "description": "服务器内部错误"
          }
        }
      }
    }
  },
  "components": {
    "schemas": {
      "User": {
        "type": "object",
        "properties": {
          "id": {
            "type": "integer",
            "format": "int64",
            "description": "用户ID"
          },
          "username": {
            "type": "string",
            "maxLength": 50,
            "description": "用户名"
          },
          "email": {
            "type": "string",
            "maxLength": 100,
            "description": "邮箱"
          },
          "passwordHash": {
            "type": "string",
            "maxLength": 255,
            "description": "密码哈希"
          },
          "createdAt": {
            "type": "string",
            "format": "date-time",
            "description": "创建时间"
          },
          "updatedAt": {
            "type": "string",
            "format": "date-time",
            "description": "更新时间"
          },
          "lastLogin": {
            "type": "string",
            "format": "date-time",
            "description": "最后登录时间"
          },
          "status": {
            "type": "integer",
            "description": "用户状态(1:激活,0:禁用)"
          },
          "bio": {
            "type": "string",
            "description": "用户简介"
          },
          "avatarUrl": {
            "type": "string",
            "maxLength": 255,
            "description": "头像URL"
          }
        }
      }
    }
  }
}

说明:
路径:/getUserInfoById 被映射到 GET 方法,该方法通过查询参数 userId 获取用户信息。
响应:
200:返回用户信息。
400:请求参数错误。
404:未找到指定的用户。
500:服务器内部错误。
组件:定义了 User 的 schema,包含了用户的各项属性,如 id, username, email 等。
这样你就可以根据这个模板生成符合 OpenAPI 规范的 API 文档。- 复制自己需要的内容到Dify中创建工具即可。
《Dify创建自定义工具》有1条评论